About Me

I grew up in the Blue Ridge Mountains of Virginia where I also attended college and met the love of my life. I lived in NYC for five years with my husband and Westie, Mack Brown before recently moving all the way across the country to Los Angeles. I'm an amateur chef, total foodie, lover of Westies, sports fanatic and self-proclaimed book worm. You'll find a little bit of all these things I love on this blog. And...most importantly, I'm a new mom to the most precious baby boy, Austn Robert, born this past October.

Amanda

Amanda

Brad

Brad

Austin Robert

Austin Robert

Mack Brown

Mack Brown

Tuesday, January 31, 2012

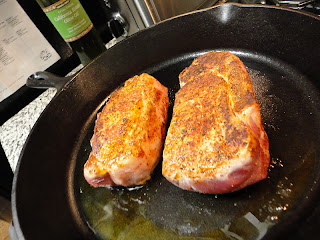
Paprika & Chili-Spiced Pork Chops

This is such a simple and delicious dinner.  Plus, you can have it ready in less than 30 minutes.  Great for a quick weeknight meal.

I used boneless pork chops, but this rub and cooking method would also work with bone-in pork chops, boneless, skinless chicken breasts, or a good white fish like tilapia.

The broccoli I made on the side was divine as well.  I actually just made it again last night with another meal.  It's that good.

Paprika & Chili-Spiced Pork Chops


1 tbsp. extra virgin olive oil
4 boneless pork chops {about 1 1/2 inches thick}
1 tsp. paprika {I used smoked paprika, but regular works as well}
1/2 tsp. chili powder
salt and pepper

Preheat the oven to 400 degrees.

In a large cast iron skillet, heat the olive oil over medium-high heat.  Let the pan get really hot before you put the meat in, so that the meat will brown properly.

Salt and pepper the chops and then rub with the paprika and chili powder.  When the skillet is hot, add the pork chops, and brown on each side for 2-3 minutes.


Transfer the pan to the oven and cook all the way through, about 18-20.  {If your pork chops are only a bout an inch thick, reduce the cooking time to 10-12 minutes.}

While the pork chops are cooking make the broccoli.  Take one head of broccoli, cut into florets, and add it to a medium-sized sauce pan along with 2 chopped garlic cloves, 1/3 cup of water and 2 tbsp. soy sauce.  Cook over medium-high heat with the lid on for about 5 minutes, and you'll have the perfect compliment to your spiced pork chops!

Source: adapted from Real Simple Dinner Tonight: Done!

Monday, January 30, 2012

Turkey & Kale Soup


I most often come up with new recipes when I have ingredients at home that I know I need to use before they go bad.  {It kind of makes me feel like I'm on Chopped, although my ingredients are normal compared to that show!}  This recipe resulted from one of those times.  I knew I had ground turkey that needed to be cooked and some kale that needed some attention.  I thought about making a salad or cooking up some kale wraps, but I ended up settling on soup.  And, I'm so glad that I did.  Kale is delicious in any soup, and was a perfect compliment to the ground turkey in this dish.  Such a warm and hearty, yet light soup!

I didn't do this, but if you want to add a little more depth of flavor (and color), try adding about a tablespoon of tomato paste to the cooked turkey before pouring in the chicken broth.  I'm definitely doing that next time.


Turkey & Kale Soup


2 tbsp. extra virgin olive oil
1 onion, diced
2 celery stacks, diced
1 large red  bell pepper, diced
1 lb. lean, ground turkey
1 tsp. herbes de Provence
1 tbsp. tomato paste {optional}
4-5 cups chicken broth
1 {14.5 oz.} can white beans, drained
1 bunch kale, chopped and de-stemmed
salt & pepper

In a large stock pot, heat the olive oil over medium-high heat.  Add the onions, celery and red pepper.  Cook until soft, 4-6 minutes.  Add the ground turkey and cook all the way through.  Salt and pepper to taste and add the herbes de Provence {this is also where you'll add the tomato paste, if you're using it}.

Once the meat is cooked all the way through, add the chicken broth and beans before bringing the soup to a simmer.  Add the kale, and allow the flavors to simmer for about 30 minutes.

Sprinkle with Parmesan cheese before serving.

Thursday, January 26, 2012

Roasted Lemon Garlic Shrimp


This recipe has been making the rounds on Pinterest, and it looked too good to pass up, so I made it the other day.  And, wow.  It is so easy and so good.  Plus, you can do a million things with the shrimp once you cook them.  I just cut open two avocados and filled them with the shrimp to make little "shrimp boats," but the possibilities are endless.  Such a good recipe to have in your back pocket.

Roasted Lemon Garlic Shrimp


1/3 cup extra virgin olive oil
1 lemon zested, cut in half and sliced in wedges
3-4 fresh thyme sprigs
sea salt and fresh black pepper
2 tbsp. butter
1 lb. fresh, medium-sized shrimp, deveined (I left the tails on to lock in some moisture, but you can pull them off before cooking as well)
5 garlic cloves, crushed

Preheat the oven to 400 degrees.

In an 8x8 baking dish, add the olive oil, lemon zest, lemon slices, thyme sprigs, sea salt and black pepper.  {I actually used a 8x11 baking dish, and it worked just fine.} The olive oil should cover the entire bottom of the pan, so add a little more if necessary.   Roast in  the oven for 10-12 minutes.

Remove the pan from the oven and add the butter.  Once the butter is melted and incorporated with the olive oil, add the shrimp.  Mix everything together, and pop the pan back in the oven for another 8-10 minutes, or until the shrimp are pink and their tails begin to curl.  Check back often, so that you don't overcook your shrimp.


Remove the shrimp from the oven and serve with pasta/ rice/ couscous/  avocado....really anything works!

Source: very slightly adapted from Cinnamon, Spice & Everything Nice

Wednesday, January 25, 2012

Westie Wednesday

I found this on B's phone the other day: 


This dog LOVES to snuggle.

Tuesday, January 24, 2012

Old Place

I LOVE trying out new restaurants wherever I ago.  Admittedly, I often plan my trips around the food more than anything else.  {Sad, but true.}  But every once in a while, I come across a gem that was off my radar.  I find that rarely do I love restaurants when they are just picked on a whim, but there are always the exceptions.

Old Place is one of the exceptions.  Last Saturday, B and I headed out of the city toward Malibu to scope out some wineries for my parents' visit in a couple of weeks.  One of the wineries we visited was a place called Cornell Winery & Tasting Room in Agoura Hills.  We were instantly charmed.


Unfortunately, the tasting room was unable to serve wine that day due to an issue with the state, but we were told to head to the restaurant next door {Old Place} where we would be able to have a glass of wine.  Of course, we followed orders and, boy, am I glad we did because apparently we stumbled upon a local favorite, and for good reason.


Not only was the decor of the restaurant warm and inviting, but the food was delicious.  B got a steak sandwich cooked on the fire pit out back with the butteriest, creamiest noodle bake on the side, and I had a wild mushroom and goat cheese frittata served in a cast iron skillet with sourdough toast on the side slathered in the most delicious salty butter ever.


Our lunch was amazing, but we were told that dinner is even better.  I'm thinking we'll be making a return trip very soon.

Monday, January 23, 2012

Chicken, Ham & Swiss Roulades

I love Real Simple magazine {especially their recipes} and I love cookbooks {I read them cover to cover}, so when I opened up this gift from my parents on Christmas morning, I was SO excited:


Not only does this cookbook contain some of my favorite Real Simple recipes that are already mainstays in my kitchen, but I found a lot of inspiration for new dishes to add to my kitchen repertoire.  There are literally TONS of post-it notes now sticking out of this book in my kitchen.

The first recipe I decided to make: chicken, ham & Swiss roulades.  So. Simple. So. Delicious. and healthy too.  Plus, you probably already have all the ingredients in your kitchen, so you can make some tonight!


Chicken, Ham & Swiss Roulades 
Serves 2

1 lb. boneless, skinless chicken breasts (2 full-sized breasts)
4 thin slices cooked ham
2 very thin slices Swiss cheese
2 tbsp. extra virgin olive oil

Heat the oven to 400 degrees.  

Place each chicken breast between plastic wrap and, using a meat tenderizer, pound the chicken breasts into chicken cutlets.  You want to the cutlets to be no more than 1/4 in.-thick.

Unwrap the chicken and salt and pepper both sides.  Layer the ham, then the cheese on top of the pounded chicken.


Carefully roll the chicken, ham, and Swiss into a log shape, and skewer the roulades closed with toothpicks.


In an ovenproof skillet, heat the olive oil over medium-high heat.  Add the roulades, and cook on all sides until browned.  This will take about 4-6 minutes.  Transfer the skillet to the oven and roast the roulades until cooked through, about 18-20 minutes.

Serve with a small green salad on the side and some good Dijon mustard.


Source: slightly adapted from Real Simple's Dinner Tonight: Done!


Saturday, January 21, 2012

Proud

Guess who's the newest member of Tri Sigma sorority!?!

This girl.


So proud and happy for you, Sarah!!

Friday, January 20, 2012

Friday Five

In the countless number of hours I spend weekly on Pinterest, I would say I've accumulated the most pins under my "Eat Your Heart" category.  {This is the category where I store all the yummy looking recipes that come across my radar, duh.} So, to help me focus on a couple of dishes {out of the sea of MANY} that I'm dying to try soon, I give you the five most delicious and lust-worthy recipes that I've pinned lately:

Pinned Image
Crock Pot Garlic-Parmesan Chicken with Orzo {love one pot meals!}
Pinned Image
Homemade Cheez-its {only 5 ingredients!}
Pinned Image
Pizza crust made from cauliflower {SO intrigued}

Pinned Image
Cheesy Quinoa Bites {Superbowl party?}
Pinned Image
Homemade, organic fruit roll ups

Happy Friday!


Thursday, January 19, 2012

Guest Basket

I wanted to share with you all the guest basket that we made for Jeremy and Danijela when they came to visit.  I got the idea after coming across this pin on Pinterest, and I immediately stored it away for future use.  Here's what the basket ended up looking like:


I think a good rule of thumb when deciding what to put in the basket is to include items your guests will need, items your guests might want, and a couple special items that you know your guests will love.  Here's what we put in the basket:


  • shampoo & conditioner
  • a bar of soap
  • a loofah
  • q-tips
  • toothpaste
  • floss
  • mini toothbrushes
  • Advil
  • Altoids
  • hand sanitizer
  • 2 large bottles of water
  • 2 bottles of coconut water (a J & D favorite)
  • almonds
  • fruit & nut trail mix
  • energy bars from Trader Joe's
  • a bar of dark chocolate
  • prosecco (to start the trip of right!)

Obviously, you can put as much or as little in the basket as you thing your guests will need, but be sure to add in a couple of things that are their favorites.  That's what will truly make your guests feel special.  Leave the basket somewhere in their room for them to discover on their own.  {The only thing I want to do differently next time is to make some sort of welcome sign to attach to the basket, but overall I was pleased with our first effort!}

J & D loved their basket, and Brad and I such a fun time putting it together.  We can't wait until our next guests (my mom & dad!) come to visit, so that we can create a basket just for them!

Wednesday, January 18, 2012

Stuffed Pepper Soup


I love recipes that take an old classic, like stuffed peppers, and give them a new twist.  So, when I found this recipe, I knew I had to try it.  I usually make stuffed peppers during the summer months when the green peppers are at their peak, but by using the same ingredients and turning them into a soup, I was able to give stuffed peppers an updated "winter time" feel.  This is the perfect dish to warm your belly on a cold night.  And, it really does taste like a stuffed pepper!

The original recipe called for serving the soup over a bed of rice, but I opted for leaving out this step.  And, you know what?  I can honestly say I didn't miss the rice.  But, my all means, if you want to serve it over rice, go for it.  You'll just add to the authenticity of the soup!


Stuffed Pepper Soup

1 lb. lean ground beef
1 tbsp. extra virgin olive oil
2-3 green bell peppers, chopped
1 small onion, finely diced
3 garlic cloves, chopped finely
1 (14.5 oz) can diced tomatoes
1 (14.5 oz) can fire-roasted diced tomatoes
1 3/4 c. tomato sauce
2 c. chicken broth
1/2 tsp. dried marjoram
salt and pepper to taste

In a large pot,  saute the onions, peppers and garlic in the olive oil for 4-5 minutes over medium heat.  Next, add the ground beef and cook until brown, about 5 minutes.  Salt and pepper to taste.  If you're not using a lean ground beef, make sure you drain the fat before moving on to the next step.


Add the remaining ingredients, stir everything together, and turn the heat up to high to bring to a boil.  Once the soup is boiling, lower the heat to a simmer and cook on low heat for about 30 minutes.  Serve with your favorite shredded cheese on top!


Source: adapted from Gina's Skinny Recipes

Tuesday, January 17, 2012

Santa Barbara Wine Tour

Our good friends Jeremy and Danijela came to visit the fist week of January, and to celebrate, we decided to make a short day trip to Santa Barbara and take a wine tour.  SO.MUCH.FUN.

We hired a limousine for the day and rode around visiting different wineries.


We picked up lunch at a local sandwich shop and had lunch (and wine!) at one of the many vineyards on our list.


We cheers'd to friendship.


We took blurry pictures.  


And, we ended the night in Santa Barbara with one of the best dinners I've had in a long time.


I also learned a few things along the way:

1.  I could happily spend the rest of my life living/ working on a vineyard.
2. Wine tours are way more fun when you hire someone to drive you around. Yay for Jerry.
2.  My new favorite wine is a Roussanne.  It's a white wine with both the fresh, fruity elements of a white and the  rich, body of a red.  Try this wine.  It's a revelation.
3. Duck ravioli is ahhhh-mazing.  So rich. So decadent. So wish I had some right now.
4. California gets more and more beautiful the more we explore it. Truly.


Santa Barbara, I can't wait to come back!

Monday, January 16, 2012

Swiss Chard and Goat Cheese Custard Bake

Man. I've been the worst kind of blogger lately.  I have no excuse.  Maybe you'll accept this yummy, creamy, dreamy custard bake as my way of apology.

I originally made this Swiss chard and goat cheese custard bake as a side dish for our Christmas Eve dinner, but it's also a dish that can stand alone as the main course.  Plus, it's really easy to make, so there's no need to save it for special occasions.  This recipe serves anywhere from 6-8 people, so if you're cooking for only one or two, it can be dinner one night and serve has leftovers or even lunch the rest of the week.  I'm really into dishes that can do that lately.  Plus we've been getting a lot of Swiss chard from our CSA fresh produce deliveries lately, so this recipe was a great way to incorporate this great (and abundant!) winter veggie.  You could also use kale if you don't like/ don't have Swiss chard on hand.  Any hearty, winter green would work.

Swiss Chard and Goat Cheese Custard Bake


1 large bunch of Swiss Chard leaves, de-stemmed and chopped
1 tbsp. olive oil
1 large onion, chopped
6 oz. goat cheese (use the soft goat cheese that comes in a log)
1/2 c. 1% milk
8 eggs
1/4 c. low-fat, part-skim shredded mozzarella cheese
4 tbsp. grated Parmesan cheese
salt and pepper to taste

*The goat cheese needs to be room temperature in order to mix easily with the milk.  So, take it out of the fridge, and let it come to room temperature about an hour before cooking.

Preheat the oven 350 degrees.  Spray a round casserole dish with non-stick cooking spray.

Heat the olive oil in a large frying pan.  Add the onion and saute 4-5 minutes, until the onions are translucent.  Add the Swiss chard all at once.  Allow to wilt for 2-3 minutes, and then remove the Swiss chard/ onion mix from the heat and allow to cool while you prepare the remaining ingredients.


In a large bowl, mix the milk and goat cheese together.  Mix until you have removed all the chunks and you have a thick, creamy liquid.  In a small bowl, beat the eggs.  Add the eggs to the milk/ cheese mix and beat everything gently together.  Add the Swiss chard, mozzarella cheese, and 2 tbsp. of the Parmesan cheese, salt and pepper.  Pour the greens mixture into the casserole dish.  Top with the remaining Parmesan cheese.


Bake in the oven for 1 hour or until the custard has set and is slightly browned on top.


Serve a small portion alongside your favorite meat, or have a larger portion and serve with green salad on the side.

Source: Kalyn's Kitchen

Monday, January 9, 2012

The Best Guacamole

Sorry I've been MIA for a few days.  We had visitors last week, and I wanted to soak up every minute of their visit while they were here.  Stayed tuned for more about the fun times we had...

In the meantime, I wanted to share with you my all time favorite guacamole recipe.  I made some this weekend while B and I vegged out on the couch watching football, relaxing after our guests left.  The secret to the perfect guacamole is to make fresh pico de gallo first.  Pico de gallo is so simple to make.  Just chop up some Roma tomatoes, onion, jalepeno, and cilantro, and then mix everything together with lime juice and salt.  The pico will need to sit for bit while all the ingredients mix and meld together and release some of their juices, but once you're pico is ready, the rest is a piece of cake. 

The Best Guacamole

3 avocados
3 large Roma tomatoes, seeded and diced
1/2 yellow onion, diced
2 jalapenos, seeded and finely chopped
1 large handful of cilantro, stems removed and chopped
1/2 lime, juiced
salt to taste

For the pico de gallo: Cut up the tomatoes first.  Cut each tomato lengthwise into four equal pieces.  Use a spoon to carefully scoop out the seeds and juice.  Slice the tomatoes into thin strips and chop evenly.  Next dice the onion.  Try to keep the diced onion the same size as the diced tomatoes.  Next, add the chopped jalapeno, setting aside about 1 tbsp.  Last add the finely chopped cilantro, lime juice and salt.  Mix everything together and allow to sit for about 1 hour in the fridge. Drain the excess juice before adding to the avocados.

In a large bowl, add the avocados.  

Here's how I easily cut avocados:  Take your knife and slice the avocado lengthwise while rotating your knife all the way around the avocado.  Once you've made a slice all the way around, set down your knife, and twist.  The avocado should come apart into two pieces.  Pick up your knife again and tap the blade into the seed.  Once the blade sticks, gently twist and the seed should pop right out.  Finally, use a spoon to scoop the avocado out of its shell.  

Once the avocados are in the bowl, mash the avocados to your preferred consistency.  Then add your desired amount of pico to the avocados and gently mix everything together.

Sprinkle the reserved chopped jalepenos on top and serve with chips.  Yummmmmmm.


Tuesday, January 3, 2012

Happy New Year!

I know, I know.  I'm a little behind, but can you believe a new year is here already?  2011 was a big year for our family, and we already have lots of fun plans for 2012!

We rang in the new year this year at a wedding for our good friends Anne and Scott.  You might be thinking...a wedding on New Year's Eve?  (Yes, we heard that from many people), but it was such a fun way to spend the holiday.  We got to celebrate the love of two amazing people and party and dance away the end of 2011.  I wish we had a wedding to go to every year on NYE!

The wedding was downtown LA at the California Club.  Such a beautiful space for a wedding. Here are a few pictures from the night:


Cheers to 2012!