About Me

I grew up in the Blue Ridge Mountains of Virginia where I also attended college and met the love of my life. I lived in NYC for five years with my husband and Westie, Mack Brown before recently moving all the way across the country to Los Angeles. I'm an amateur chef, total foodie, lover of Westies, sports fanatic and self-proclaimed book worm. You'll find a little bit of all these things I love on this blog. And...most importantly, I'm a new mom to the most precious baby boy, Austn Robert, born this past October.

Amanda

Amanda

Brad

Brad

Austin Robert

Austin Robert

Mack Brown

Mack Brown

Wednesday, August 31, 2011

Westie Wednesday


Because Mack doesn't do airplanes, we decided long ago that we would drive across the country on our move to LA.  Unfortunately, as city dwellers, we haven't needed a car since we moved up here almost five years ago, so we've been out of the car loop for quite a while.  It's crazy to have to start thinking about car and insurance payments again and budgeting for gas....ugh!  But, despite all that, we are both VERY excited to have a car again.  

So, a couple of weeks ago, Brad and I bit the bullet and bought a new car!  Very exciting as it was our first big purchase together.  Well, we actually weren't together when we bought it (Brad was in LA finding us somewhere to live and I was in Virginia visiting family).  But, thankfully my wonderful parents were there to walk me through the joys (and trials) of buying a new car.  Thanks Mom and Dad!  

We LOVE the new car and can't wait for our trip across the country on our way to LA.  Even Mack has given his seal of approval. (Luckily, he doesn't yet know how much time he is going to be spending in it....ha!)


Friday, August 26, 2011

German Potato Salad


I just got an email from my husband asking why I haven't blogged in two days.  Don't worry, I haven't forgotten about everyone.  Things have just been a little hectic around here.  I just got back from my trip back home to VA two days ago and now I'm packing again.  That's right.  Brad and I happen to live in the Zone A evacuation zone in NYC.  So, out we go.  Thanks Irene.

Since most of us on the east coast are going to be spending the weekend inside, here's a recipe that will warm your belly while you wait out the storm.  If you're lucky enough to be far far away from the wrath of Irene, this would be a great recipe to make and take to picnic.  Outside.  In the sun.  Yes, I'm a little bit a lot jealous.

German Potato Salad
1 lb. small white potatoes, halved
1 lb. small red potatoes, halved
1 tbsp. extra virgin olive oil
1/2 c. chopped pancetta
1 onion, diced
1/2 c. chicken stock
1/4 c. apple cider vinegar

Put the potatoes in a large pot, over completely with water, add salt and bring the potatoes to a boil.  Once the water is boiling, turn the heat down to a simmer and cook for about 20 minutes.  The potatoes should be fork tender.  Drain the water and set the potatoes aside.


Add the olive oil to a saute pan at medium heat.  Add the pancetta and cook until brown.  Add the onion and saute with the pancetta until soft and translucent.


Add the onion/ pancetta mixture to the potatoes.  Heat the potatoes over medium-low heat.  Add the chicken stock and apple cider vinegar, put the lid on the pot, and cook for about 5 minutes longer or until the potatoes have absorbed the stock and vinegar.


Serve warm.

Wednesday, August 24, 2011

Oven Baked Barbecue Spare Ribs


This is a recipe that my brother and I threw together ourselves while he was visiting.  We made a lot of really yummy dishes during his short visit, but this, by far, was the crown jewel.

I've always steered clear of making ribs in my tiny little NYC apartment because of the mess that I thought they would create, and the fact that I don't have a full-size grill to finish them off with a nice char.  But, this recipe is easier, cleaner and more delicious than any other ribs recipes I've ever tried.

You start with a dry rub on the ribs and about half a bottle of beer.  The ribs slowly cook in the oven for a couple of hours before you slather them with your favorite barbecue sauce and turn the heat up to bake for another quarter of an hour.  The result is a mouth-watering, fall-off-the-bone, rib that you'll want to make again and again.

The dry rub recipe was adapted from this recipe here at the Food Network.  The rest of the recipe is all ours :)

Oven Baked Spare Ribs
3 lbs. spare ribs (this serves 3-4 people)
1/2 c. beer
1 bottle of good barbecue sauce (the amount you use will vary according to your taste)
*We used Stubb's Smokey Mesquite Bar-B-Q Sauce (I highly recommend!)

Dry rub:
1/8 c. sweet paprika
1/2 tbsp. onion powder
2 tsp. salt
1 tsp. Italian seasoning
1 tsp. garlic powder
1/4 tsp. cumin
1/8 tsp. cayenne pepper


Preheat the oven to 300 degrees.

Combine all seven ingredients of the dry together in a small bowl.  Cut the ribs in half and place in a large baking dish.  Using all the dry rub, rub the ribs on all sides, coating well, and place back in the baking dish with the fat facing up.  Allow the ribs to sit with the dry rub for about an hour before moving on to the next step.


Add enough beer to cover the bottom of the baking dish--don't cover the ribs all the way!  Cover tightly with aluminum foil to lock in all that yummy moisture that will steam the ribs slowly.  Place in the oven and cook for 2 1/2 hours.  Keep an eye on the ribs, checking on them frequently, to make sure they don't dry out.  If they start to dry out, just add more beer to the baking dish.

I forgot to take a picture before they went in the oven, but this is what they looked like after  2 1/2 hours.
After taking the ribs out of the oven, turn the heat up to 350 degrees.  Take the ribs out of the dish and pour out the beer and other accumulated juices.  Put the ribs back in the dish and brush your favorite barbecue sauce on all sides of the ribs and place back in the oven for another 15 to 20 minutes, uncovered.


Once the ribs come out of the oven for the final time, add more barbecue sauce, if you like (I like!) and allow to sit for a few minutes before cutting and serving.


Enjoy and make sure you have LOTS of napkins!!


Sunday, August 21, 2011

Succotash

This is such a healthy, easy and versatile side-dish that pairs well with almost anything.  I usually serve it with grilled scallops or shrimp on top, but before I left for my trip to VA, I made Brad a big container to eat alongside some turkey meat loaf while I was gone.


Succotash is fun to make because you can delete and/ or add vegetables and ingredients according to the season, your mood, or (in my brother's case) your ever changing taste-buds.  When I make succotash, I like to cook the vegetables just enough that they begin to soften up, but still maintain a little bit of a bite.  But, if you prefer your veggies cooked further, just cook longer.  You really can't go wrong.

My recipe was adapted from this recipe by Ellie Krieger on the Food Network.

Succotash
1 onion, diced
2 cloves of garlic, minced
1 medium zucchini, halved and sliced into half-moon shapes
2 1/2 c. of frozen corn
1 1/4 c. frozen edamame, shelled
1 pint grape tomatoes, halved
salt and pepper
1 tbsp. apple cider vinegar

Add the onion to a skillet and cook over medium-high heat until softened, about 2 minutes.  Add the garlic and saute until fragrant, about 30 seconds.  Add the zucchini, corn, and edamame, and cook for about 7 minutes, turning the heat down to medium.


Add the tomatoes, vinegar, salt and pepper at the very end.  Saute a couple minutes longer and then serve.  This succotash makes a great side-dish with a hot meal, but it's also great cold :)


Friday, August 19, 2011

White Beans in Hot Sauce


My brother came to visit me earlier in the week to hang out for a couple of days before riding back to Virginia with me.  (What a good brother I have, huh?)  While he was there I made him go grocery shopping with me  at Whole Foods.  (I'm evil. I know.)  We were hungry, so we decided to eat lunch before shopping.  Always a smart plan.  I LOVE the hot food bars at Whole Foods.  They always have new, interesting salad options to try.  Paul found a white bean salad with hot sauce, which was delicious, and I was instantly intrigued.

As a little back story--Brad is a member of the "Hot Sauce of the Month Club," courtesy of my brother.  This means we get 2 new hot sauces every couple of months to try out.  And, since hot sauce can last for a LONG time, we have a lot of hot sauce.  So, I'm always looking for ways to incorporate it into my cooking.  This white bean salad with hot sauce is the perfect way.  Paul and I tried to replicate what we ate at Whole Foods the best we could, and, personally, I think we did a pretty good job.  Check it out.

White Bean Salad with Hot Sauce


2 (15 oz.) cans of cannellini beans
1/4 c. onion, diced
2 scallions, thinly sliced
1/2 c. of your favorite hot sauce

The hot sauce that Paul and I used was called Cackalacky Spice Sauce and had sweet potatoes in it.  You can order it here.


To make the salad just combine all the ingredients and stir gently so that you don't mash the beans.  You can eat it right a way or stick it in the fridge to cool down a bit.  Either way, it's deliciously spicy.

Wednesday, August 17, 2011

Westie Wednesday: Road Trip!

Hello from Virginia!  My baby sister is starting college NEXT WEEK (I still can't believe it!), so Mack and I decided to make a road trip back home to visit my family and help her move in.  Mack loves visiting my parents house because he actually gets to play outside in the grass!  Really big deal for a city dog.  He literally hasn't stopped smiling since we arrived.

Here's a cute shot from the road of Mack at the wheel. 


And here's Mack in his element!


Happy Wednesday!

Monday, August 15, 2011

Insalate con Peche


This salad is the perfect summer salad for easy entertaining.  It can be thrown together quickly and is delicious every time.  The peaches add the sweet, the prosciutto adds the salty, and the mozzarella cheese adds that smooth, creamy element that ties it all together.  Throw together an easy lemon vinaigrette that you can drizzle over top at the last minute and you're ready to serve it alongside your main dish.

Insalate con Peche
1 (6 oz.) package spring greens mix
1 small ball fresh mozzarella, sliced
2 large, fresh, ripe peaches, peeled and thinly sliced
4 oz. thinly slice prosciutto
1/2 c. extra virgin olive oil
1/4 c. fresh lemon juice (approx. 1 lemon)

Place the greens on a large serving platter.  Top with mozzarella, prosciutto and peaches.  Play around with the placement of the toppings.  I like to cut thin slices of mozzarella and make little pockets of prosciutto.

Mix together the olive oil and fresh lemon juice until you've created an emulsification.  Add salt and pepper to taste.

Drizzle dressing over top before serving.

Saturday, August 13, 2011

Breakfast & a Movie

I have two things for you this Saturday--a fun breakfast trick and a movie recommendation.

One of the things I love the most about having summers off is getting to eat breakfast with Brad in the morning.  We usually keep things pretty simple--eggs, whole grain toast and fresh fruit.  Brad usually has an omelet and I alternate between an omelet and scrambled eggs.  Sometimes, though, we like to veer off course a little bit and experiment with different ways to eat the same ole' thing.  Hence the creation of egg-in-a-pepper (very similar to egg-in-a-hole, where you cut a hole out of the middle of a piece of toast and fry an egg in the middle).

This breakfast trick could not be easier.  All you need is a pepper (any color will work) and eggs.  Cut the pepper into 1/2 inch-thick rings.  Spray your frying pan with  non-stick cooking spray.  Cook the pepper slices at medium-high heat 1-2 minutes on each, and then carefully crack one egg inside each pepper slice.  (If a little egg runs out, don't worry.  You can just scrape around the pepper and get rid of it.)  Sprinkle the egg with salt and pepper.  Cook the egg until desired doneness, and serve with bacon.  They're not only delicious, but really pretty :)


Last night Brad and I went to see Rise of the Planet of the Apes with our friend Tom.


Verdict: Definitely a movie worth seeing.

James Franco plays Will, a doctor obsessed with developing a cure for Alzheimer's.  The drug, of course, is tested on apes.  Without giving too much away, Will brings home a baby ape, named Ceasar, and ends up raising him as his own child before things eventually begin to go wrong.  James Franco is terrific as well as Andy Serkis, who plays Caesar.  The bond created between Will and Ceasar is incredible, fascinating and gut-wrenching.  I'll admit I cry more than the average person when watching movies, but I sobbed like a little baby more than once during this movie (I haven't cried that much when watching a movie since Marley and Me).  Don't let this deter you, however.  Go see the movie, just consider yourself warned (and go prepared with a box of tissues).

Thursday, August 11, 2011

Charred Corn Risotto with Herb Shrimp Skewers


Every Wednesday in the Spring and Summer we have a small Farmer's Market across the street from our apartment, so Mack and I headed across the street today to pick up some fresh produce.  We came back with some fresh corn that I decided to grill up and toss into some risotto.  To take the dish to the next level, I marinated some shrimp in a mustard herb sauce, skewered them and threw them on the grill as well. The result was pure deliciousness.  

*This recipe will serve 2-3 people with some leftover risotto for lunch the next day.

Charred Corn Risotto
3 1/2 c. chicken broth
3 tbsp. butter
1/2 large onion, diced
2 cloves of garlic, minced
1 c. arborio rice
1/2 c. good white wine
1/2 c. Parmesan cheese, grated
1 c. of grilled corn kernels (about 4 ears of corn)
2 scallions, finely chopped (separate the whites and greens)
salt and pepper

Pour the chicken broth into a small saucepan and warm over medium heat until you are ready to add it to the rice.  Stick the corn on the grill and continue turning until each side is charred.  When the corn is ready, remove it from the grill and cut the corn kernels off the cobs.


In a large skillet, melt the butter.  Add the onion and white parts of the scallions and saute until translucent (about 8 minutes). Next, add the garlic for about 30 seconds or until fragrant.  Now add the arborio rice.  Stir together and allow the rice to toast for a minute or two.


Then, add the wine.  Stir together until most of the rice has absorbed the liquid.  Using a soup ladle, add about a 1/2 c. of the broth to the rice.  Stir constantly, again until the rice has absorbed most of the liquid.  Repeat until all of the chicken broth has been incorporated into the rice.  


Turn off the heat, add the Parmesan, corn, and green parts of the scallions.  Gently stir everything together.


Herb Shrimp Skewers
12-16 extra large shrimp, peeled and deveined but with the tails still on
1/3 c. extra virgin olive oil
1 tsp. Dijon mustard
1/4 tsp. dry mustard
1/2 tsp. Herbs de Provence
1/4 tsp. salt
pepper
 
In a medium-sized mixing bowl, add the oil, the mustards, herbs, salt and pepper.  Mix everything together and add the shrimp.  Cover with plastic wrap and allow the shrimp to marinate in the refrigerator for 30 minutes.  (Make the shrimp before you start the risotto so that they can marinate while you make the risotto.  Then you can quickly grill the shrimp while you add the finishing touches to the risotto.)


Skewer the shrimp.  You can do this however you want.  I had small skewers, so I put three shrimp on each, but if you have larger skewers you can up the number.  Spray your grill with a non-stick spray and grill the shrimp about 2-3 minutes per side.  This is super quick and easy to do right before you plate.


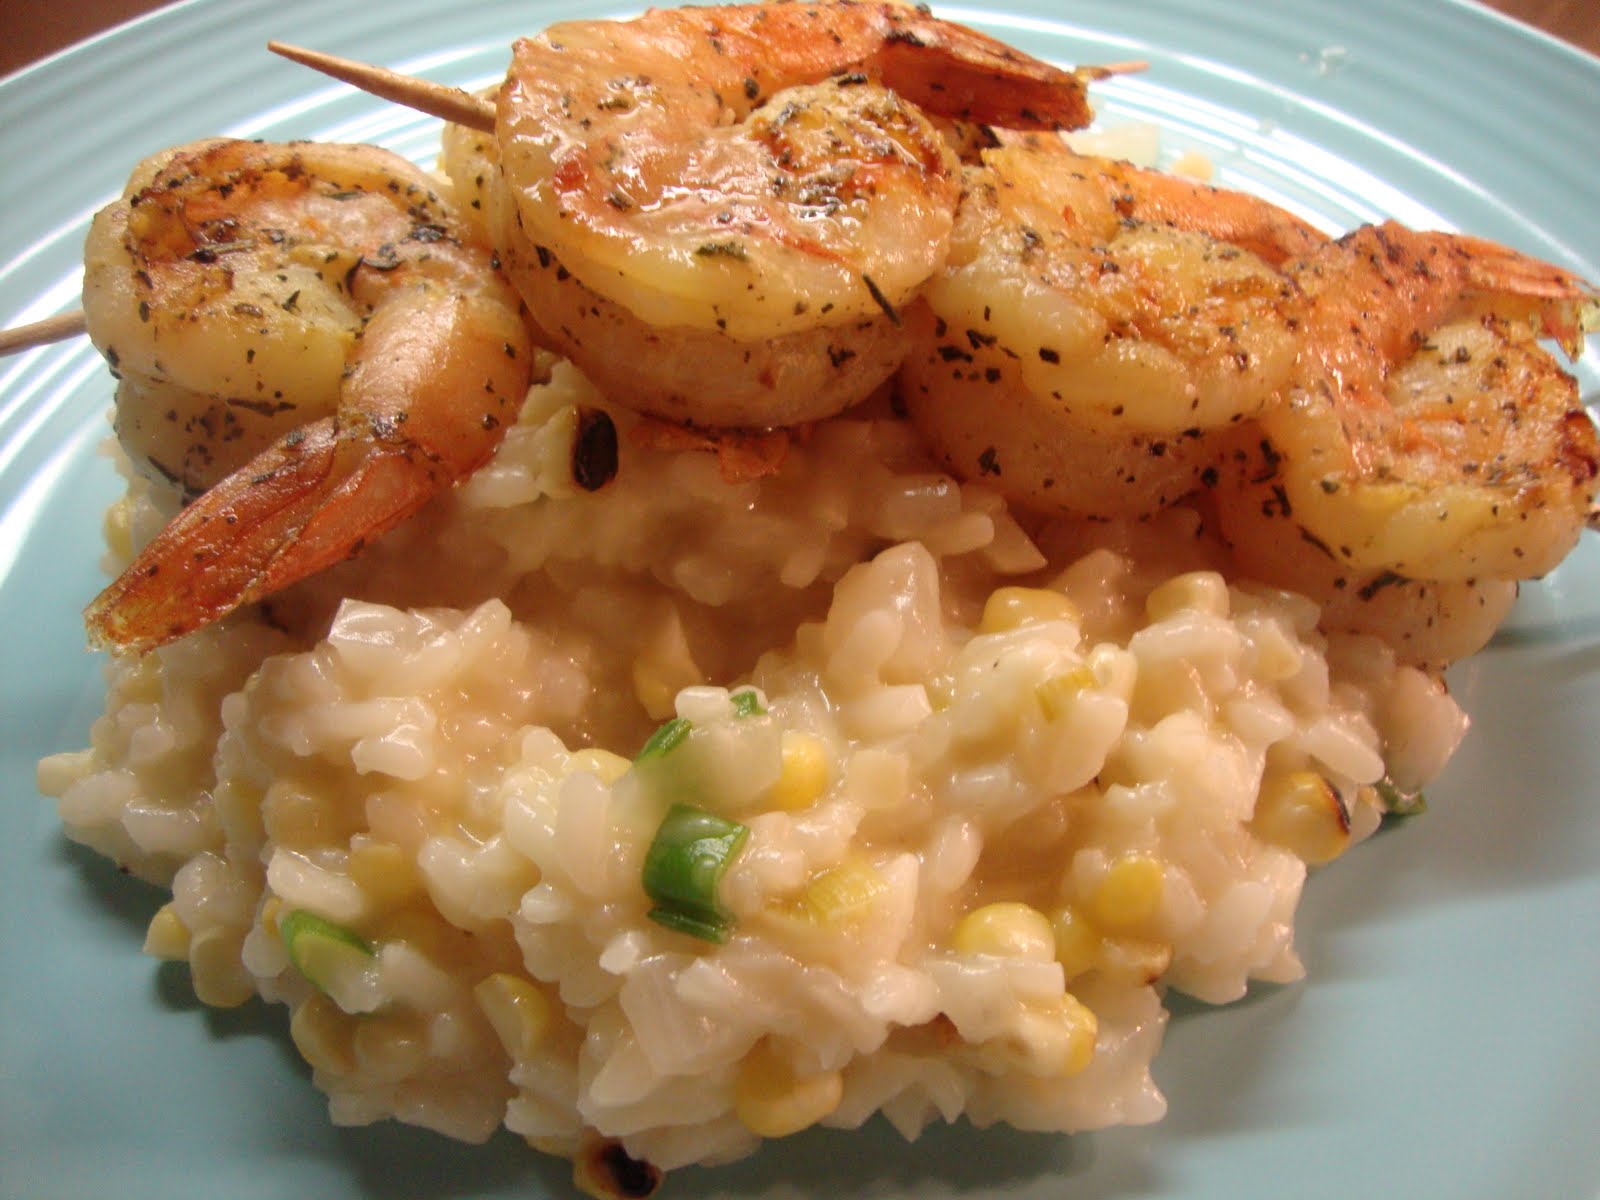
Scoop some ooey-gooey risotto on a plate, place the shrimp skewers on top, and you're ready to eat!


Wednesday, August 10, 2011

Westie Wednesday: Before-and-After Photo Shoot

We finally did it last week.  We bit the bullet and scheduled a grooming appointment for Mack.  I don't know why we always put off making these appointments, but we always do.  Alas, I finally tired of hearing about how Mack looked like he had "put on a couple of pounds" and swiffering up POUNDS of dog hair each day....ugh.

So, without further ado, here are a couple of photos that show you Mack "before" and "after" his grooming appointment with the lovely Lucy.  Prepare to be shocked :)

BEFORE
What a fluff ball!
Poor thing could barely see!
And now for the big reveal... (drum roll please)

AFTER


How cute is he?  Looks like a completely different dog, right?  If only I came back looking so much skinnier after getting my haircut!  One can always dream, I suppose :)

Tuesday, August 9, 2011

Cherry Tomato Quiche


I love summertime tomatoes and I love quiche.  So, trying out this recipe was a no-brainer.  It was soooooo yummy, and so versatile.  The recipe provides a perfect egg-cream-cheese base that could work with a variety of vegetables and/ or meats, depending on your mood and the season.

I decided to make my own dough for the crust (first time ever!), but wasn't 100 percent pleased with the way it turned out, so I'll have to keep trying on that front.  I would suggest just purchasing a pre-made dough and saving yourself some time :)

Cherry Tomato Quiche
4 large eggs
1/2 c. heavy cream
1/2 c. low-fat, part skim ricotta cheese
1/2 c. grated Parmesan cheese
1 tsp. fresh basil, chopped
pepper
1 pint cherry tomatoes


In a large bowl, whisk together the eggs and heavy cream first.  Then add the ricotta, Parmesan, basil, and pepper to taste.  Mix everything together well.


Pour the egg mix into the pie crust.  Drop the tomatoes into the egg mix--you can add as many or as few as you like.


Bake in the oven at 350 degrees for 45 minutes.  You can serve the quiche hot or cold.  Enjoy!!


Saturday, August 6, 2011

A Good Cause: Ringgold Reads


In my blog-stalking yesterday, I came across a really good cause that I wanted to share with you all.  

Ringgold Reads was first originally created by book blogger, Julie at BookHooked, and southern author Susan Gregg Gilmore.  Here's the description about Ringgold Reads from their Facebook page:

Ringgold Reads is a group of authors, readers, and bloggers who came together after the devastating tornadoes that destroyed large portions of Ringgold, GA on April 27, 2011. This represents a long-term effort to rebuild the community with a particular emphasis on Ringgold Middle School and Ringgold High School. We are embracing this opportunity to rebuild and rehabilitate our community with an emphasis on literacy and the joy of reading and writing.

Book Donations May Be Mailed to:
MARK PIERCE, RHS ENGLISH DEPARTMENT HEAD
29 TIGER TRAIL
RINGGOLD, GA 30736

There is a list of the books needed on their Facebook page and on Julie's blog.  They are accepting new or used books right off your bookshelf.  Check it out and see what you can do to help!


Friday, August 5, 2011

Garlicky White Bean Dip


Just in time for the weekend, I wanted to share with you a quick and easy dip that you can make when you are entertaining or when you are going to an event and need to bring a dish.   This dip is also perfect for the hot summer months when we are all taking advantage of the beautiful weather and trying to eat outside as much as possible because it won't spoil--no mayonnaise here folks!

I've been making different versions of this recipe for years.  Well, really ever since Brad and I went on our honeymoon to Malta where we had this AMAZING white bean dip (called 'Fazola bit Tewm' in Malta) served alongside bread our first dinner out.  In Maltese cooking, they make the dip with butter beans, soaking the beans and cooking them from scratch, but I find it much easier to just use canned beans.  I prefer cannellini beans, but any white bean will work.  Most recipes call for some variation of white beans, olive oil, garlic, parsley, and salt.  The amounts used depend on your taste.  I love garlic, so I make mine very, VERY garlicky.  But, if you don't like garlic as much as I do, you can always add fewer cloves.  You can also play around with the consistency of the dip.  I like it on the thicker side, but if you want yours more loose, just add more olive oil.  There's really no way to mess this up.

Once you've made the dip, you can serve it right away or store it in the fridge for up to a week.  See what I mean?  Perfect for any sort of get-together!

Garlicky White Bean Dip
2 (15 oz.) cans cannellini beans, drained and rinsed
3-4 cloves of garlic
1 large handful of fresh Italian flat-leaf parsley
1/2 tsp. salt
1/3 c. extra virgin olive oil

Using a strainer, drain and rinse the beans, shaking off all the excess water.


Pour the beans in a food processor.  Roughly chop the garlic cloves and add on top of the beans.  Next, toss in the parsley and salt and pulse everything together a couple of times in the food processor.


After a couple of pulses, begin drizzling in the olive oil.  Once everything looks smooth and creamy with tiny flecks of green, you're ready to scoop it out and serve.


The dip goes great along side almost anything from pita chips and toasted bread to pretzels or plantain chips.  Just make sure if you make it super garlicky that everyone else around you is eating it too.  Otherwise, you might start scaring people off :)

Thursday, August 4, 2011

Crispy Breaded Chicken with Goat Cheese Vinaigrette


In my opinion, the addition of cornflakes to any dish is never a bad idea.  They are so sweet and crunchy and make for a great crust.  This recipe uses cornflakes as the breading on chicken cutlets, but once you master the breading technique you could use on anything from turkey cutlets to shrimp. The possibilities are endless.

The goat cheese vinaigrette adds a fresh, tangy element to cut through the sweet crunch of the chicken.  They're the perfect combo.

Crispy Breaded Chicken
4 boneless, skinless chicken breasts
5 c. cornflakes
3/4 c. flour
1/2 tsp. salt
1/4 tsp. pepper
1/2 c. milk
1 egg

Prepare the chicken first.  Place the chicken breasts into a resealable plastic bag and seal well.  Use a meat tenderizer to pound the chicken breasts to a consistent thickness, about 1/4 in. thick.  Take the pounded chicken out of the bag and cut each chicken breast in half.  Set the chicken aside while you prepare the breading.


For the breading process, you'll need three containers.  Place the cornflakes in a small food processor and pulse until the cornflakes are finely ground.  Pour the ground cornflakes into one container.  In the second container mix the flour, salt and pepper together.  And, in the third container, whisk the egg and milk together.


Now you're ready to bread the chicken.  First, dip each chicken strip into the flour.  Make sure you fully coat all sides.  Next, set the chicken on a plate in the refrigerator for about 5 minutes.  You can make the goat cheese vinaigrette while you wait for the chicken to chill.  Don't skip this step, it helps the cornflakes stick to the chicken while cooking!


When the chicken is ready, dip each strip into the milk/ egg mixture and then into the cornflakes.  Place the chicken on a cookie sheet and cook at 450 degrees for 20 minutes.  Flip the chicken after 10 minutes.


Goat Cheese Vinaigrette (this is crazy easy and is courtesy of Real Simple)
1/3 c. extra virgin olive oil
1/4 tsp. red pepper flakes
1/4 c. chopped parsley
2 oz. goat cheese

In a small bowl, add the olive oil, red pepper flakes, and parsley.  Mix together.  Crumble the goat cheese into the oil mix.  Stir together and set aside.  The flavors will mingle and meld together while the chicken cooks.


Once the chicken is ready, serve it on a bed of orzo and drizzle the goat cheese vinaigrette over top both.  It's heavenly!